A frequently leaking garden hose can be a major hassle, disrupting your watering schedule and potentially wasting water. This comprehensive guide will walk you through identifying and fixing faulty connections, enabling you to efficiently maintain your garden watering system. Understanding common causes of leaks, like loose connectors, damaged hoses, or kinks, and applying straightforward repair techniques is key to a thriving garden. This article will walk you through the process from diagnosing the problem to completing the repair, with step-by-step instructions and helpful tips. We’ll cover several common causes of leaky hoses and offer practical solutions to effectively deal with them.
Understanding the Common Causes of Garden Hose Leaks
Loose Connections and Fittings
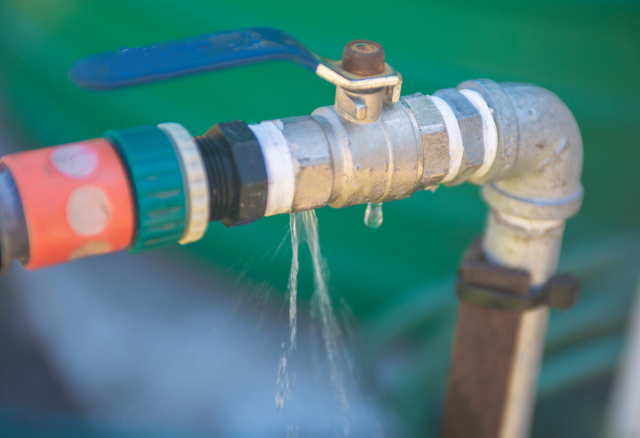
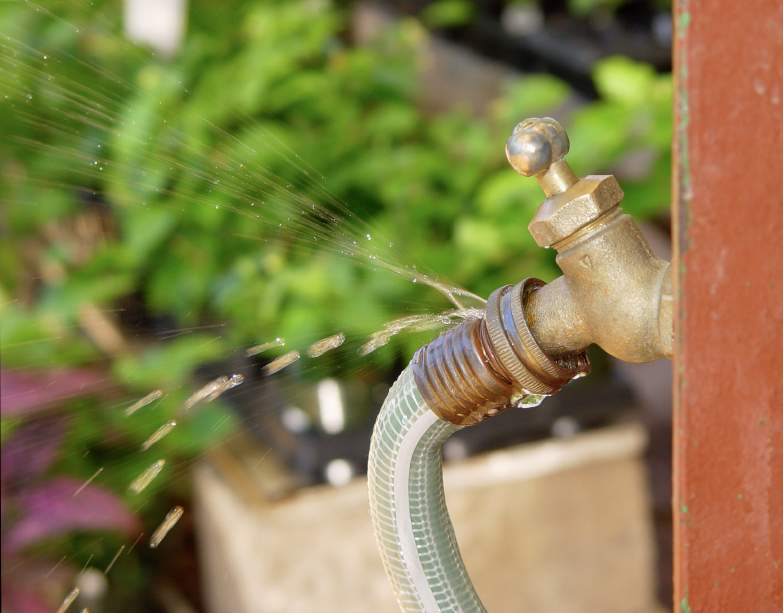
Loose connections are a frequent culprit for leaky garden hoses. Over time, the threads on connectors can loosen, allowing water to seep out. This often happens at the hose end, the connector joining the hose to the spigot, and at any couplings or fittings. Regular use and pressure fluctuations can cause these connections to loosen. Properly tightening connections is critical for preventing leakage. Inspect all connections periodically, tightening them as needed. Using plumber’s tape on the threads can prevent leaks and ensure a secure seal.
Damaged or Worn-Out Hoses
Related Post : Deck Boards Warping After Rain? How to Prevent and Repair Damage
Garden hoses can become damaged through various means. Prolonged exposure to the elements, like intense sunlight, extreme temperatures, or abrasive materials, can cause the hose to crack or tear over time. Kinks, especially sharp ones, can cause damage and stress on the hose material, leading to a weak point that will develop a leak. Frequent use and bending also contribute to wear and tear. Replacing a damaged hose is essential to prevent ongoing leaks and maintain a reliable watering system.
Obstructions and Kinks
Sometimes, a simple kink or obstruction within the hose can cause a leak. Kinks in the hose are a common issue due to improper storage, which can cause internal damage that results in leaks or reduced water flow.
Identifying Faulty Connections
Inspecting the Hose End and Spigot Connections
Thorough inspection is crucial for identifying the source of the leak. Carefully examine all connections and fittings. Look for any signs of looseness, cracks, or damage in the threads or materials of the connector. Examine the spigot and hose end for any cracks or worn-out areas. A visually apparent crack in the hose is a clear indication of needed replacement. If you observe any signs of deterioration, immediate attention is required.
Examining the Hose for Damage
Visual inspection of the hose itself is vital. Look for any cracks, tears, or bulges along the hose’s length. Pay close attention to areas where the hose bends frequently; these spots are particularly vulnerable. If the hose has been exposed to extreme temperatures, examine it for any signs of discoloration, weakening or hardening. Consider replacing the hose if damage is present.
Checking for Obstructions and Kinks
Carefully inspect the entire length of the hose for any kinks or obstructions. A kinked hose will often cause a leak, and obstructions might block water flow. Gently straighten the hose, or if you find an obstruction, use a tool to clear the clog. Check the hose for any signs of bending or breakage.
Fixing Loose Connections
Tightening Connections Properly
To fix loose connections, use a wrench or pliers to tighten the fittings without over-tightening. Applying even pressure is key to avoid damaging the threads or connectors. Use a suitable tool for each fitting type. Ensure the connectors are correctly aligned for a secure connection. Over-tightening can strip threads or break the connectors.
Using Plumber’s Tape
Applying plumber’s tape to the threads is a useful preventative measure for future leaks. Apply a thin layer of plumber’s tape to the threads of the male fitting before tightening the connection. This creates a seal and prevents future loosening. Wrap it evenly in a clockwise direction to ensure a tight bond.
Replacing Damaged Fittings
If a fitting is severely damaged or worn out, it needs to be replaced. Acquire replacement fittings at your local hardware store. The replacement process involves removing the old fitting and installing the new one, ensuring proper alignment. Refer to the specific installation instructions for guidance.
Addressing Damaged Hoses
Replacing a Damaged Hose Section
If the hose shows damage, such as cracks or tears, the damaged section must be replaced. It’s essential to replace the affected segment completely. Cut the section of hose with a sharp blade at the damaged location, ensuring a clean cut. Remove any debris or residue from the cut end. Connect the new hose section using suitable fittings. Choose a hose that is appropriate for the water pressure you anticipate using.
Replacing the Entire Hose
For significant damage or wear and tear across the entire hose, replacing the entire hose is the recommended solution. Choose a suitable replacement hose based on the required length and use case. Follow the replacement process steps mentioned previously and ensure the new hose is properly connected.
Repairing a Leaky Hose
In the case of a small tear or a puncture, a temporary fix can be attempted using a patch kit. Ensure the kit is appropriate for the type of hose. Apply the patch according to the manufacturer’s instructions, ensuring a secure seal to prevent further leakage. However, this is only a temporary solution and you may need to consider replacing the affected section or hose altogether.
Preventing Future Leaks
Proper Hose Storage
Proper storage is crucial in preventing future leaks. Store your hose in a cool, dry place to avoid damage from extreme temperatures. Avoid storing it with kinks or sharp bends. Roll it up neatly and store it on a hose reel or a designated storage area. The goal is to avoid stressing the hose and preventing kinks.
Regular Maintenance
Regular inspection and maintenance is vital to identify and address minor issues before they escalate. Clean the hose after each use, remove any debris or dirt, and allow it to dry completely. Periodically check for kinks or damage and address any issues promptly. Inspect the spigot and hose fittings for any signs of wear. Regular maintenance helps prevent leaks.
Additional Tips
Choosing the Right Hose
When selecting a garden hose, consider the length, type, and water pressure you’ll be using. The material and thickness of the hose are crucial for durability and preventing leaks over time.
Checking for Water Pressure
High water pressure can put extra stress on the hose connections and components, increasing the likelihood of leaks. Check the water pressure coming from your spigot to understand the stress levels on the hoses and connections. Knowing the water pressure allows you to select hoses that can handle it better, preventing leaks.
Identifying Specific Leak Locations
Thoroughly examine all connections for signs of water leakage. Look for any evidence of drips, moisture, or wetness around the fittings or the hose itself. Identify the specific location of the leak to target the repair efforts more effectively.
Conclusion
In conclusion, a leaky garden hose can be a frustrating problem, but with a little knowledge and the right tools, you can quickly identify and fix faulty connections. By checking for common issues like loose connectors, damaged hoses, and kinks, you can avoid costly repairs and keep your garden watering system running smoothly. Remember to always turn off the water supply before working on the hose connections. If you continue to experience issues, consult a professional plumber for assistance.
In conclusion, a leaky garden hose can be a frustrating problem, but with a little knowledge and the right tools, you can quickly identify and fix faulty connections. By checking for common issues like loose connectors, damaged hoses, and kinks, you can avoid costly repairs and keep your garden watering system running smoothly. Remember to always turn off the water supply before working on the hose connections. If you continue to experience issues, consult a professional plumber for assistance. For any gardening tips or troubleshooting guides, visit our website for more helpful resources.